Elbow dummy support formula center to center | 6″ × 4″ elbow dummy support calculation
Elbow dummy support formula center to center
Elbow dummy support 6″ × 4″ calculation formula
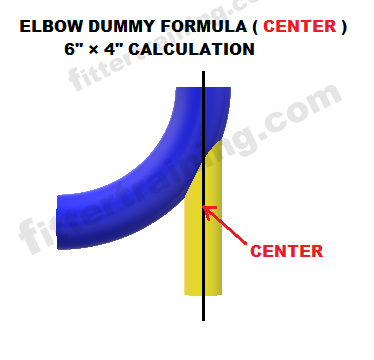
6″ × 4″ elbow dummy support ( center ) calculations
How to fabrication 6″ × 4″ elbow dummy support ( center )
6 inch elbow 4 inch dummy support calculation formula
elbow trunnion support formula Center to center 6″ × 4″

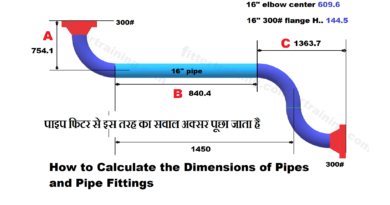
इस तरह वर्टिकल में एल्बो है और उसमें डमी सपोर्ट लगाना है सेंटर टू सेंटर फार्मूला के जरिए
कैसे कैलकुलेशन करेंगे 6 इंच × 4 इंच का
In this way there is an elbow in the vertical and a dummy support has to be installed in it using the center to center formula
How to calculate 6 inch × 4 inch
Elbow dummy support formula center to center
Elbow Radius 228 mm
Elbow size 6″ OD 168 mm
Dummy pipe size 4″ OD 114 mm
Dummy pipe size 4″ Schedule 80 I.D 98 mm
Elbow dummy support formula center to center
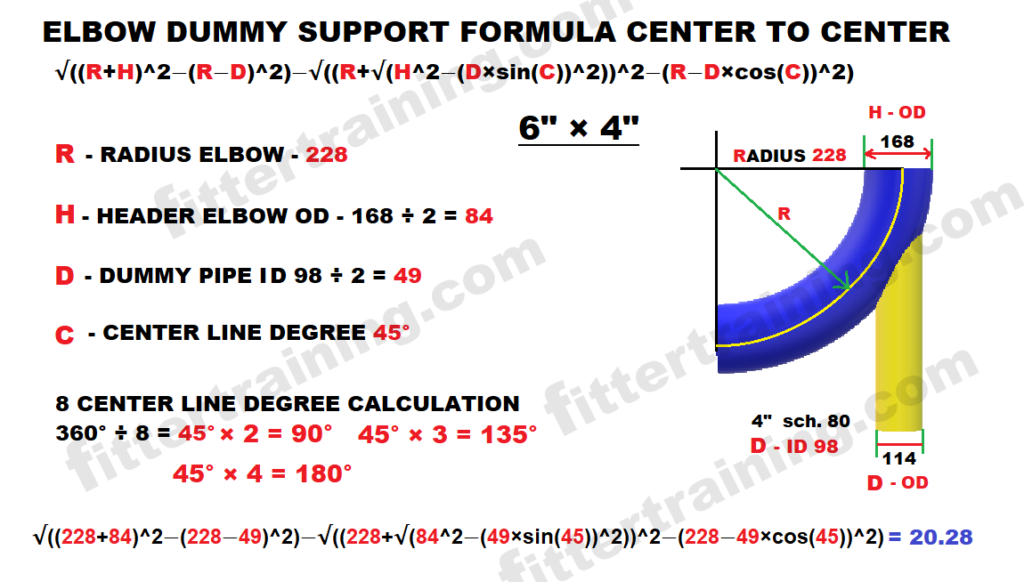
√(( R+H )^2−( R−D )^2)−√(( R+√( H^2−( D×sin( C ))^2))^2−( R−D×cos( C ))^2)
यह जो फार्मूला दिया गया है इसमें R डाइमेंशन और H डाइमेंशन और D डाइमेंशन और C डाइमेंशन
यह सब आपको इस तरह कैलकुलेशन करना है जैसे नीचे कैलकुलेशन करके दिखाया गया है
R – Radius elbow
H – Header OD ÷ 2
D – Dummy ID ÷ 2
C – Center line degree
Elbow dummy support 6″ × 4″ calculation formula
R – Radius elbow 228
H – Header OD 168 ÷ 2 = 84
D – Dummy ID 98 ÷ 2 = 49
C – Center line degree 360 ÷ 8 = 45°

8 सेंटर लाइन में बनाने के लिए 360 डिग्री को 8 से डिवाइड करें
Divide 360 degrees by 8 to make 8 center lines
360° ÷ 8 = 45°
45 × 2 = 90°
45 × 3 = 135°
45 × 4 = 180°
इस तरह सर्विस सेंटर लाइन का डिग्री कैलकुलेशन करें
Calculate the degree of service center line in this way
√((228+84)^2−(228−49)^2)−√((228+√(84^2−(49×sin(45))^2))^2−(228−49×cos(45))^2) = 20.28 mm
जिस तरह यह फार्मूला टाइप किया गया है अपने कैलकुलेटर में इसी तरह टाइप करें
यह कैलकुलेशन 45 डिग्री सेंटर लाइन के लिए कैलकुलेशन किया गया है
बाकी सेंटर लाइन का कटबैक कैलकुलेशन करने के लिए दो जगह का डिग्री चेंज करें
Type the formula exactly as it is typed into your calculator
This calculation is for a 45 degree center line
To calculate the cutback for the rest of the center lines, change the degrees at two places
√((228+84)^2−(228−49)^2)−√((228+√(84^2−(49×sin(45))^2))^2−(228−49×cos(45))^2) = 20.28 mm
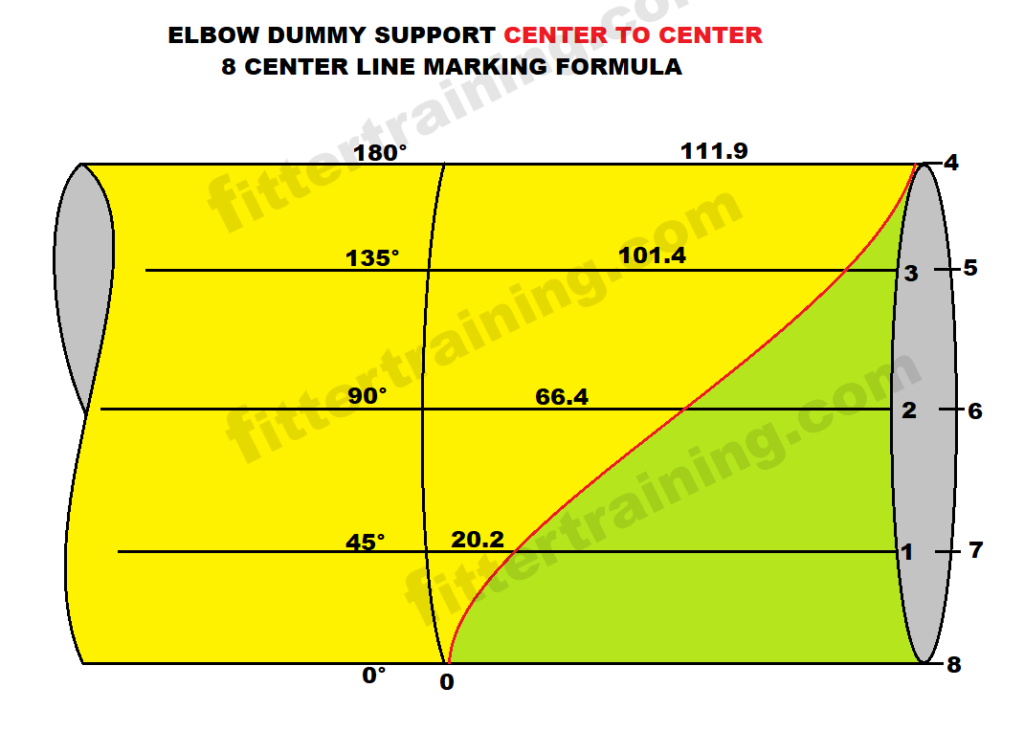
45 डिग्री सेंटर लाइन कट बैक कैलकुलेशन
√((228+84)^2−(228−49)^2)−√((228+√(84^2−(49×sin(90))^2))^2−(228−49×cos(90))^2) = 66.4 mm
90 डिग्री सेंटर लाइन कट बैक कैलकुलेशन
√((228+84)^2−(228−49)^2)−√((228+√(84^2−(49×sin(135))^2))^2−(228−49×cos(135))^2) = 101.4 mm
135 डिग्री सेंटर लाइन कट बैक कैलकुलेशन
√((228+84)^2−(228−49)^2)−√((228+√(84^2−(49×sin(180))^2))^2−(228−49×cos(180))^2) = 111.9 mm
180 डिग्री सेंटर लाइन कट बैक कैलकुलेशन

यह जो कैलकुलेशन किया गया है यह सब एक ही फार्मूला है सिर्फ इसमें अलग-अलग सेंटर लाइन के लिए डिग्री बदला गया है
इस तरह सभी सेंटर लाइन का कट बैक कैलकुलेशन करने के बाद पाइप के ऊपर मार्किंग करें जैसे डिजाइन में दिखाया गया है
All the calculations done here are the same formula, only the degrees have been changed for different center lines.
After calculating the cut back of all the center lines, do the marking on the pipe as shown in the design
8 सेंटर लाइन में मार्किंग करने के लिए पाइप का CF 8 से डिवाइड करें
और आठ सेंटर लाइन मार्किंग करें
और सभी सेंटर लाइन पर डिग्री लिखें जिस तरह ऊपर डिजाइन में दिखाया गया है
उसके बाद देखें सबसे लॉन्ग डाइमेंशन कितना आया हुआ है उतने दूरी पर एक राउंड मार्किंग करें
112 mm पर एक राउंड मार्किंग करें
और वही राउंड मार्किंग से आगे की तरफ सभी कट बैक डाइमेंशन मार्किंग करें सेंटर लाइन डिग्री के हिसाब से
To mark 8 center lines divide the CF of the pipe by 8
And mark 8 center lines
And write degrees on all center lines as shown in the design above
After that see how much the longest dimension is, mark a round at that distance
Make a round marking at 112 mm
And mark all the cut back dimensions forward from the same round marking according to the center line degrees
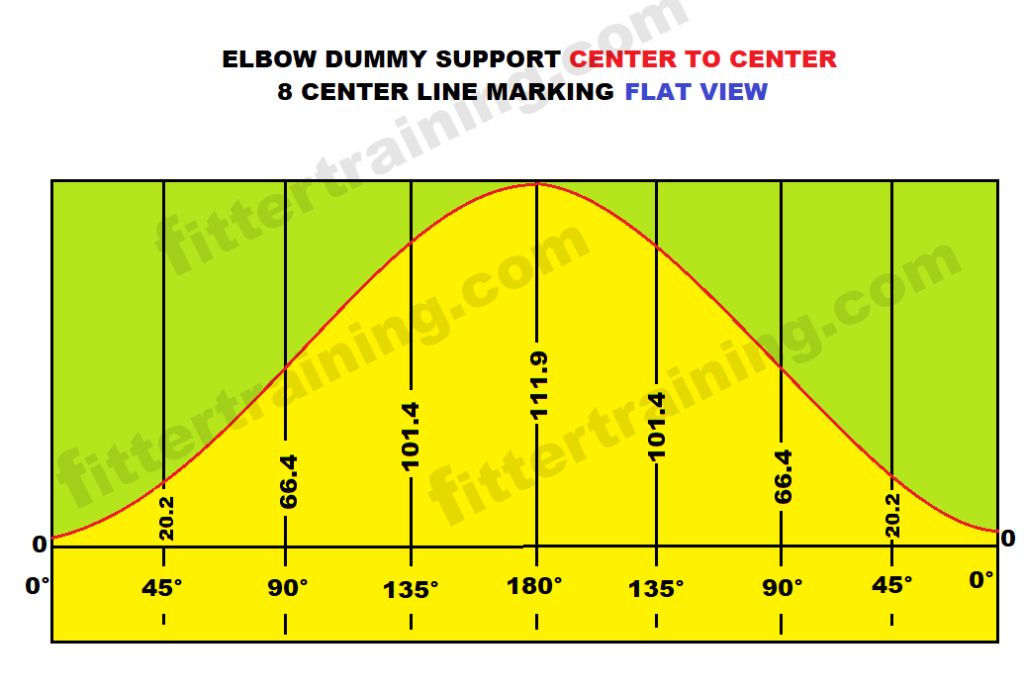
यह डिजाइन में पाइप के ऊपर मार्किंग करने के लिए पाइप का फलाट व्यू दिखाया गया है
यह फलाट व्यू मैं आपको सब सेंटर लाइन और डिग्री दिख रहा होगा कहां पर कितना मार्किंग किया गया है
ठीक ऐसे ही मार्किंग करें जैसे यह डिजाइन दिखाया गया है
In this design, a flat view of the pipe is shown for marking on the pipe
In this flat view, you will be able to see all the center lines and degrees, where and how much marking has been done
Marking should be done exactly as shown in this design
Thanks for visit my website fittertraining.com