how to fabrication Chimney Cone with plate | Chimney Cone fabrication layout marking formula
how to fabrication Chimney Cone with plate
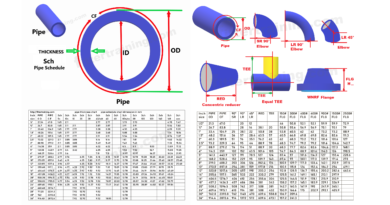
how to fabrication reduce pipe with plate
Chimney Cone fabrication layout marking formula
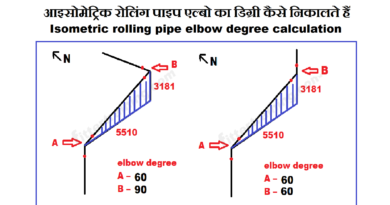
how to draw layout structural reducer
how to calculate radius layout mid ordinate length
how to calculate radius layout cord length
how to fabricated concentric reducer with layout and formula
बिल्कुल आसान फार्मूला और तरीका बताया गया है स्टेप बाय स्टेप ड्राइंग और डिजाइन के जरिए बताया गया है
फॉर्मूला और लेआउट के जरिए चिमनी कोन यानी कि रिड्यूसर कैसे फैब्रिकेशन करेंगे
Very easy formula and method is explained through step by step drawing and design.
How to fabricate chimney cone i.e. reducer through formula and layout
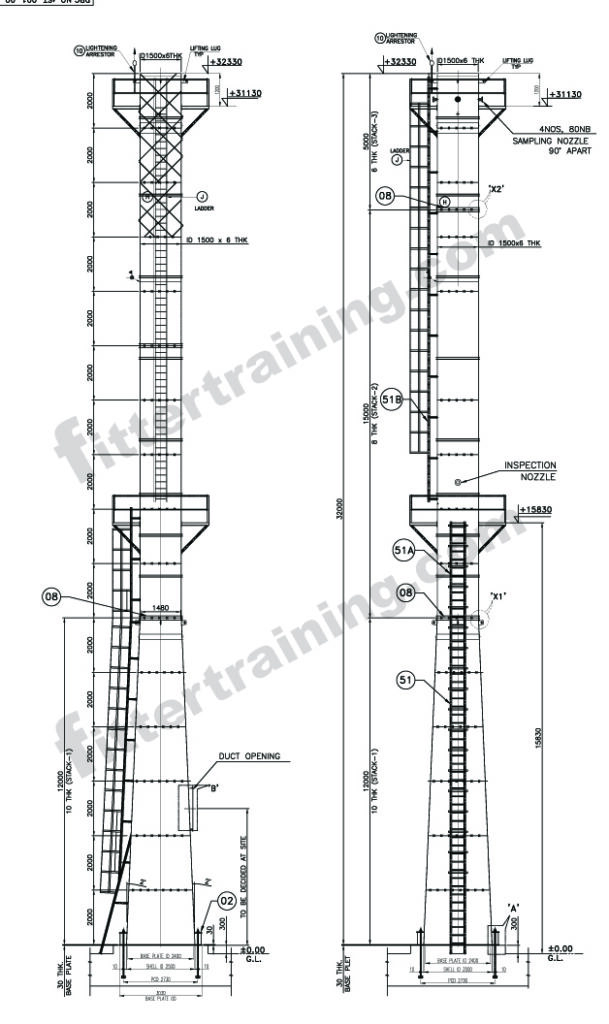
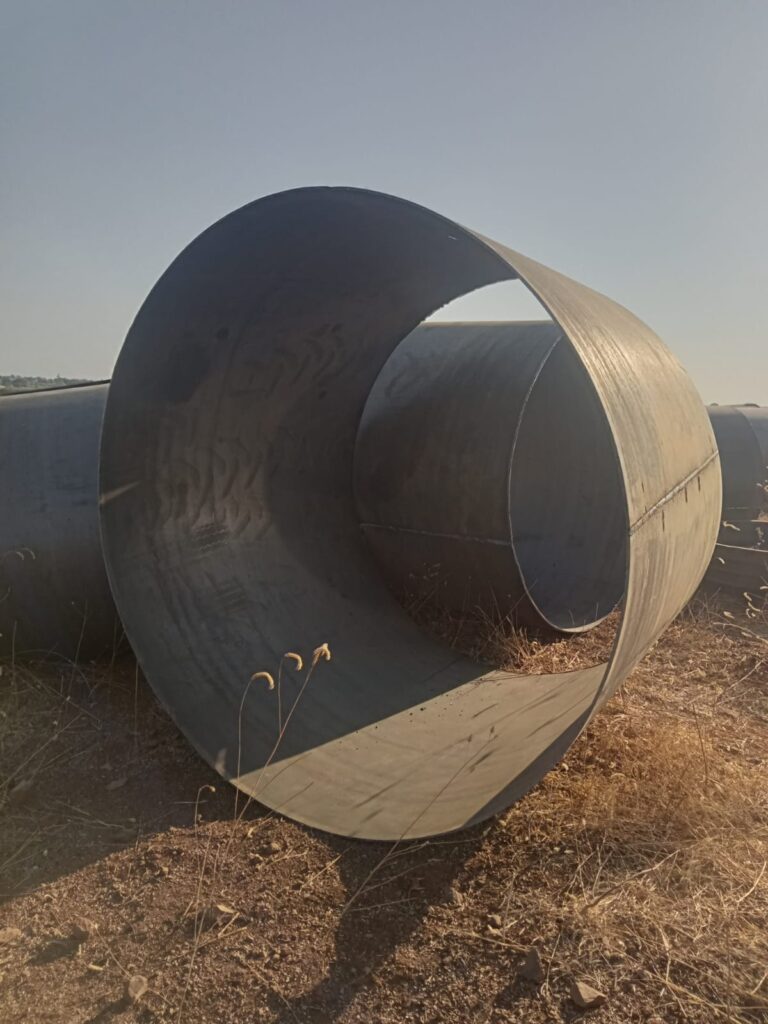
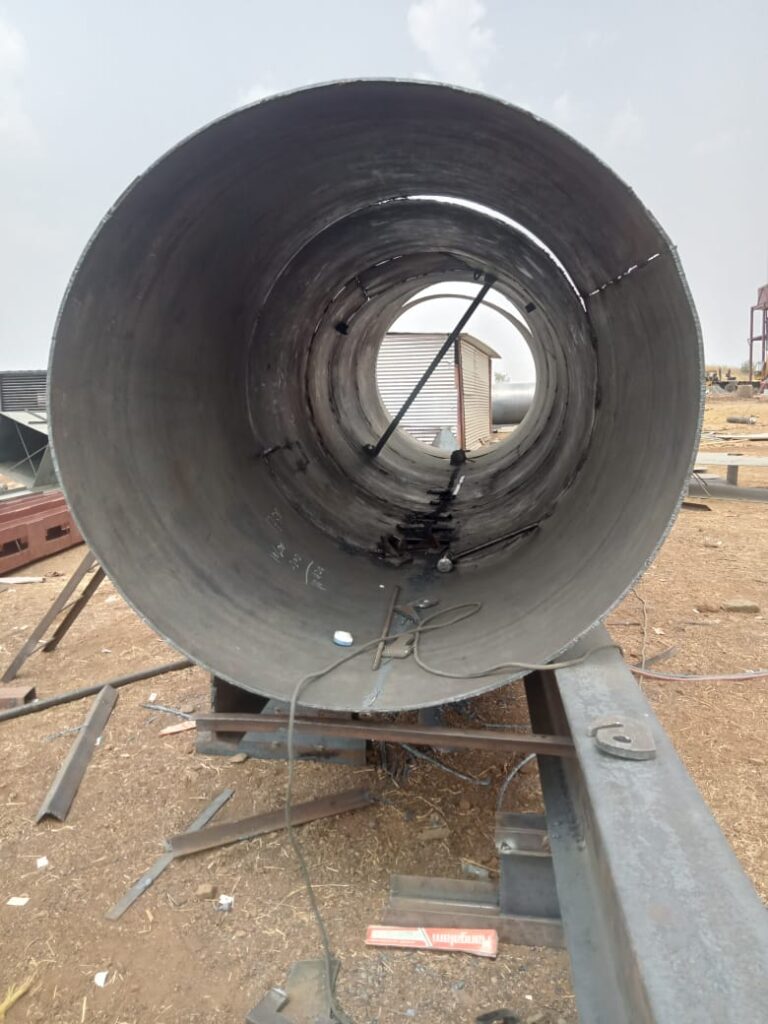
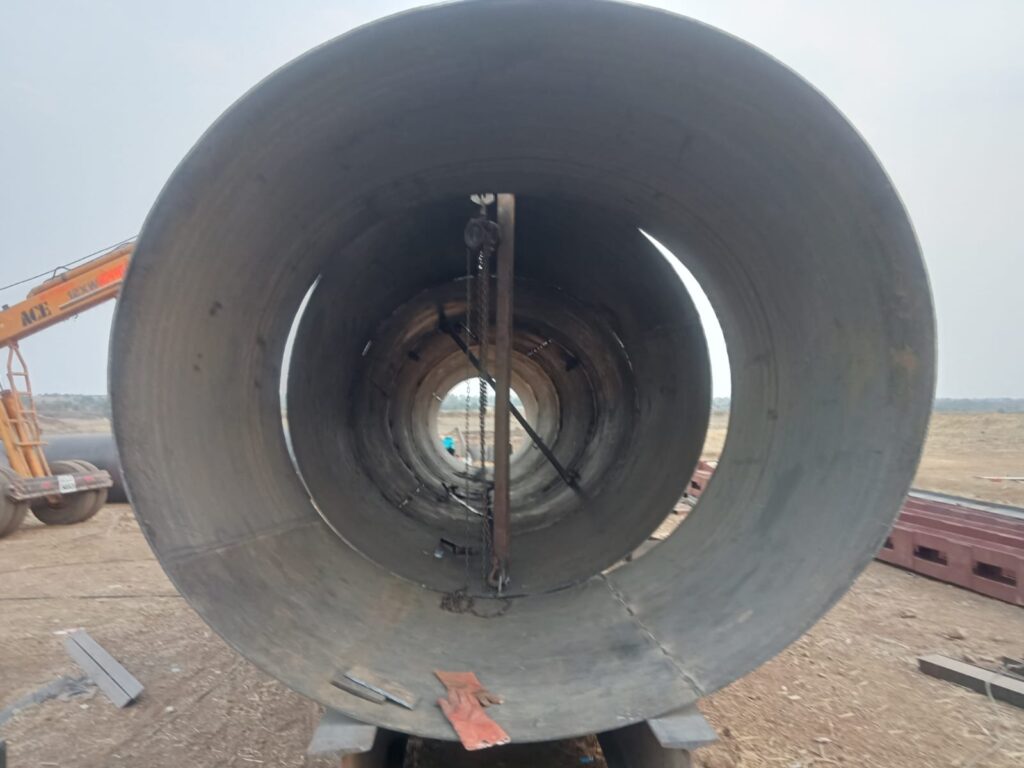
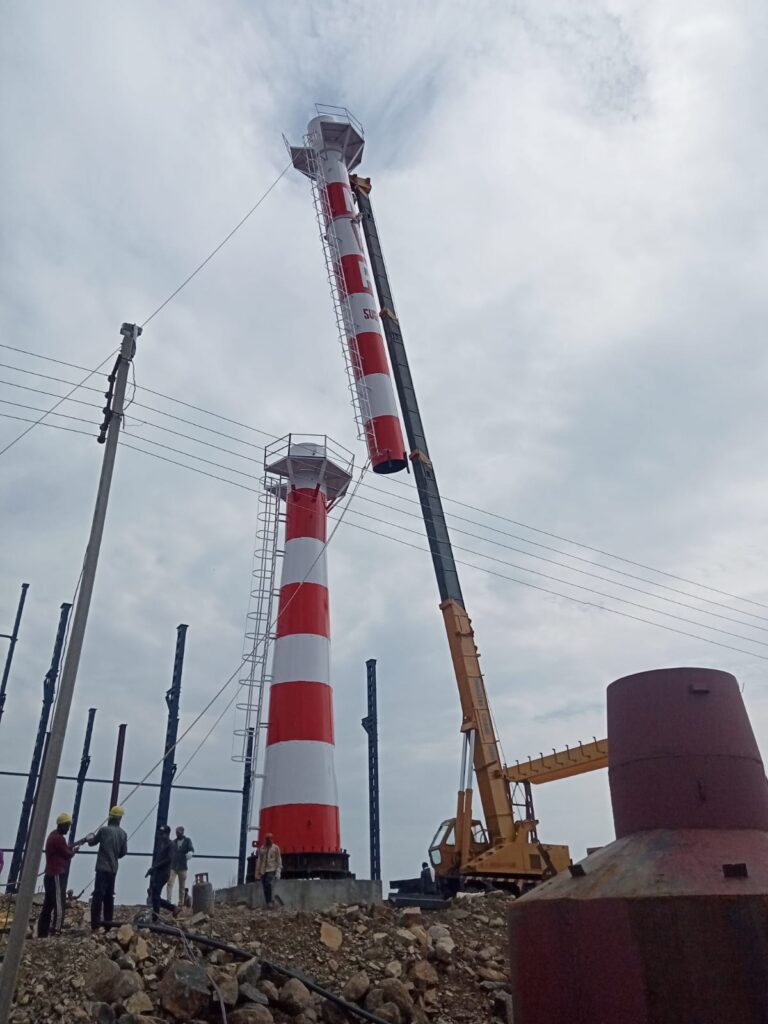
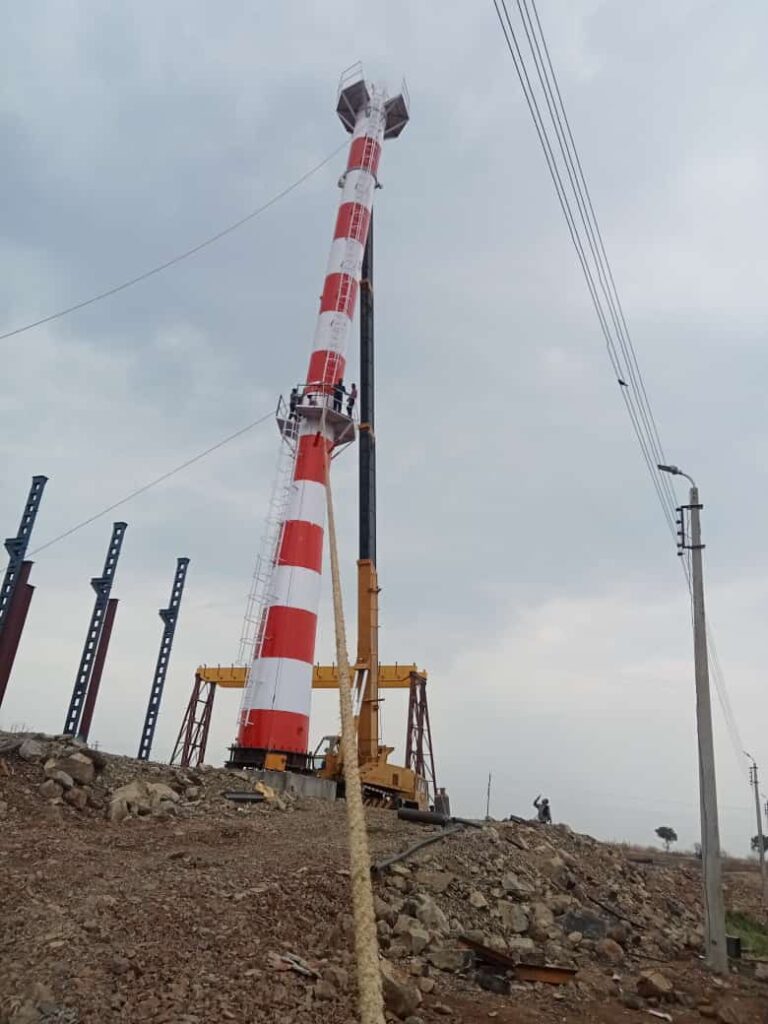
यह ड्राइंग में जो आप चिमनी देख रहे हैं इसी का रेडयुसर टाइप का कोन फैब्रिकेशन लेआउट के जरिए कैसे बनाएंगे यह फार्मूला बताया गया है
This formula explains how to make the reducer type of chimney that you see in the drawing through cone fabrication layout.
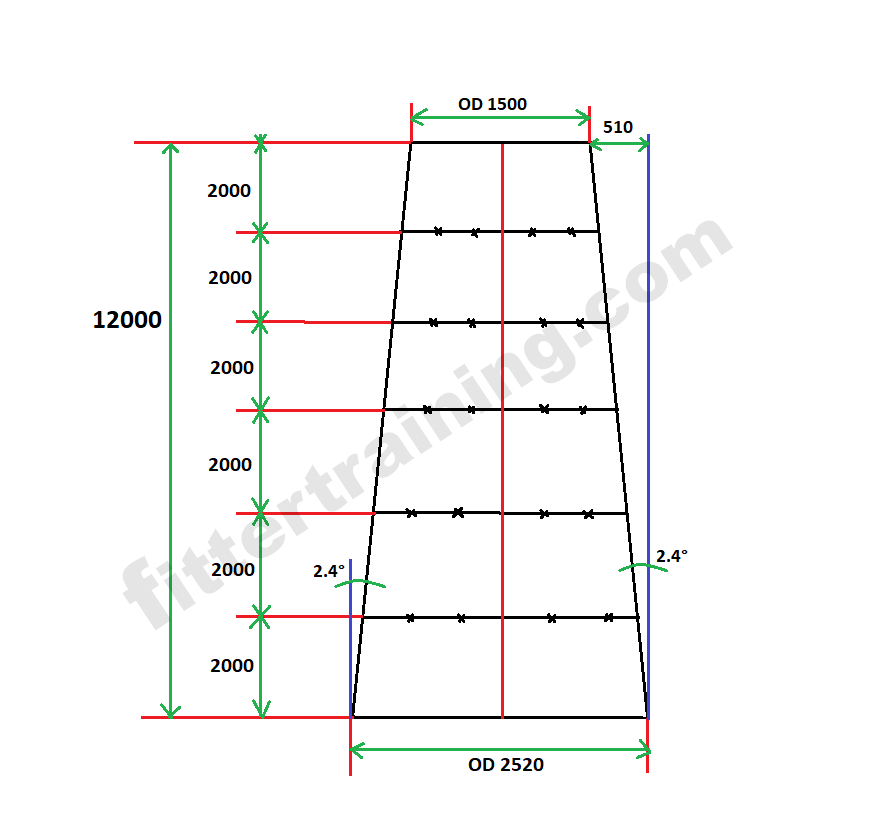
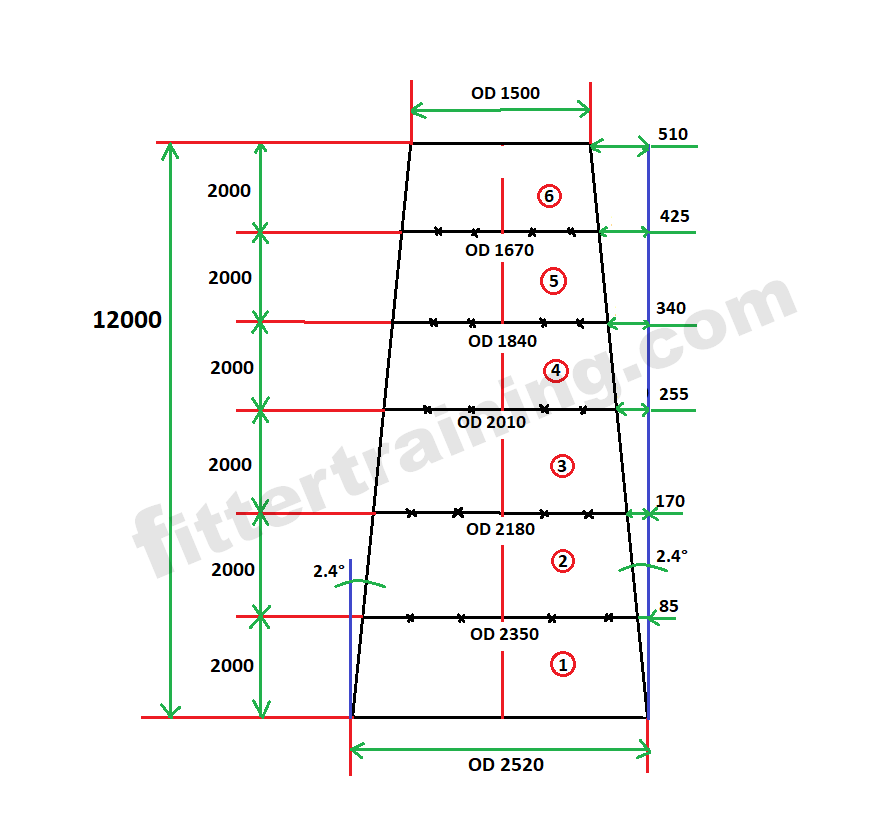
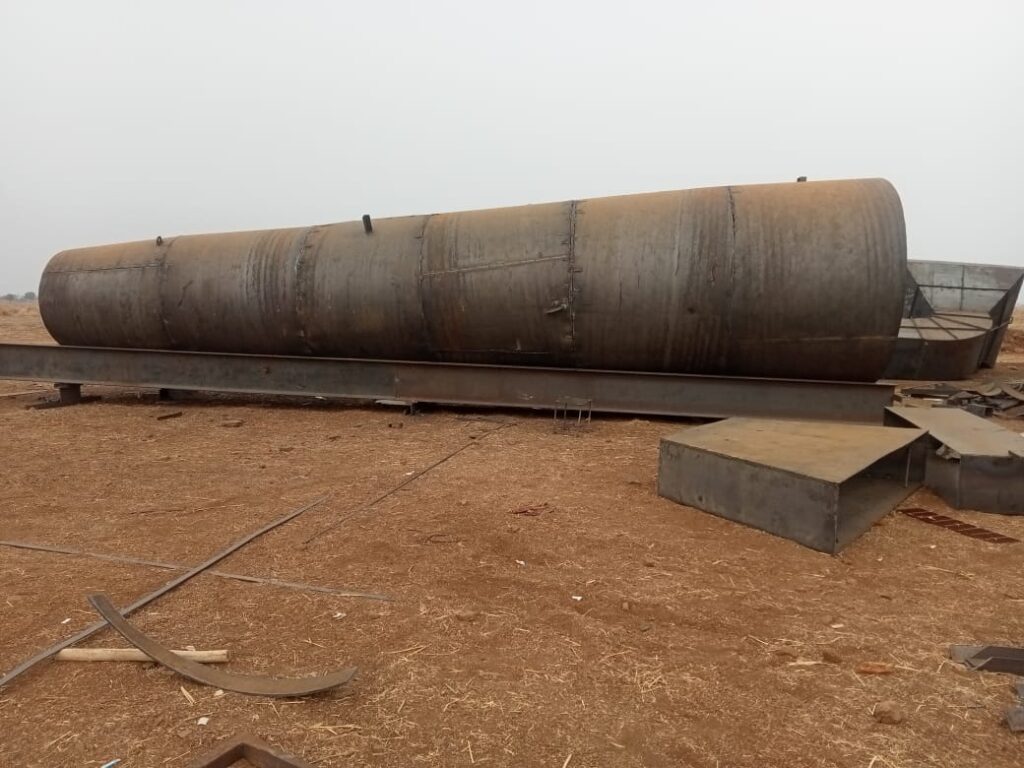
6 पाठ में कोन बनाया गया है एक कोन का ऊंचाई डाइमेंशन 2000 mm है
चिमनी का प्लेट जहां तक डिग्री में जा रहा है वहां तक टोटल ऊंचाई डाइमेंशन 12000 mm
चिमनी का नीचे का OD 2520 mm
चिमनी का जहां तक डिग्री में प्लेट जा रहा है वहां ऊपर का OD डाइमेंशन 1500 mm
6. A cone is drawn in the lesson. The height dimension of a cone is 2000 mm.
Total height dimension as far as the chimney plate goes in degrees is 12000 mm.
Chimney bottom OD 2520 mm
The upper OD dimension of the chimney as far as the degree plate is going is 1500 mm.
चिमनी कोन डिग्री 2.4 degree
2520 – 1500 = 1020 ÷ 2 = 510 mm
tan-1( 510 ÷ 12000 = 2.433606100 degree
चिमनी कोन के एक बॉटम में OD डाइमेंशन दिया गया है और एक टॉप में OD डाइमेंशन दिया गया है !
बाकी और बीच में जो चिमनी का कौन OD डाइमेंशन कैसे कैलकुलेशन करें
OD dimension is given in one bottom of the chimney cone and OD dimension is given in the other top.
Which chimney’s OD dimension is in the middle and in the middle? How to calculate it?
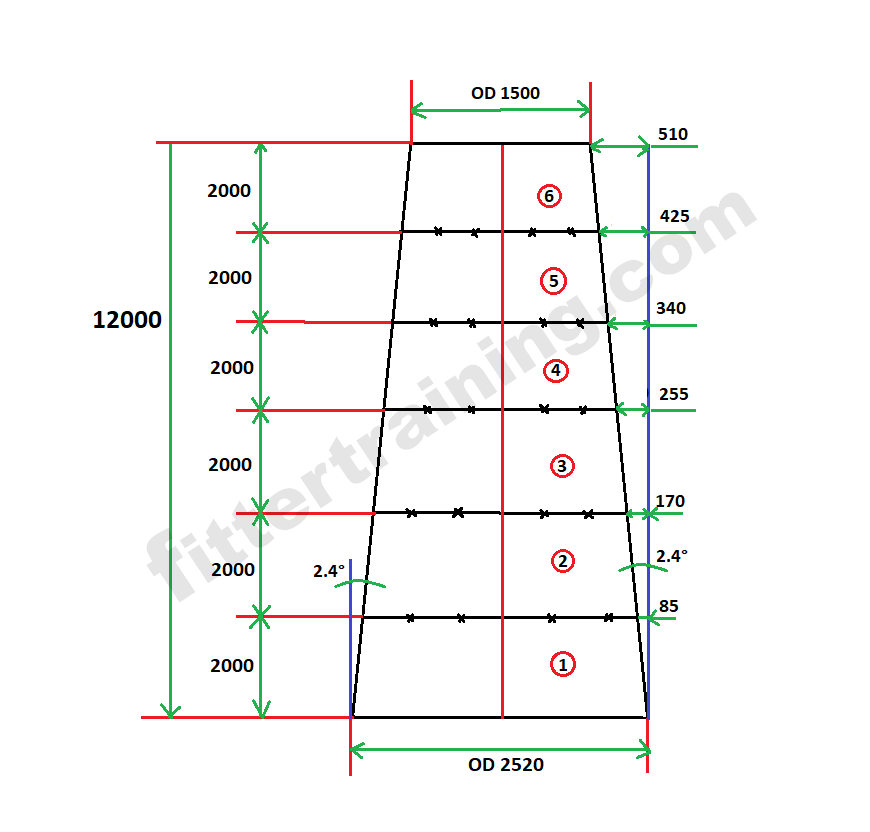
चिमनी कोन डिग्री 2.433606100 degree
tan( 2.433606100 ) × 2000 = 85 mm ( 1 )
tan( 2.433606100 ) × 4000 = 170 mm ( 2 )
tan( 2.433606100 ) × 6000 = 255 mm ( 3 )
tan( 2.433606100 ) × 8000 = 340 mm ( 4 )
tan( 2.433606100 ) × 10000 = 425 mm ( 5 )
tan( 2.433606100 ) × 12000 = 510 mm ( 6 )
चिमनी सभी कोन ओडी डाइमेंशन कैलकुलेशन
Chimney All Cone OD Dimension Calculation
( 1 ) Big Dia OD 2520 – 85 × 2 = small Dia OD 2350 mm
( 2 ) Big Dia OD 2520 – 170 × 2 = small Dia OD 2180 mm
( 3 ) Big Dia OD 2520 – 255 × 2 = small Dia OD 2010 mm
( 4 ) Big Dia OD 2520 – 340 × 2 = small Dia OD 1840 mm
( 5 ) Big Dia OD 2520 – 425 × 2 = small Dia OD 1670 mm
( 6 ) Big Dia OD 2520 – 510 × 2 = small Dia OD 1500 mm
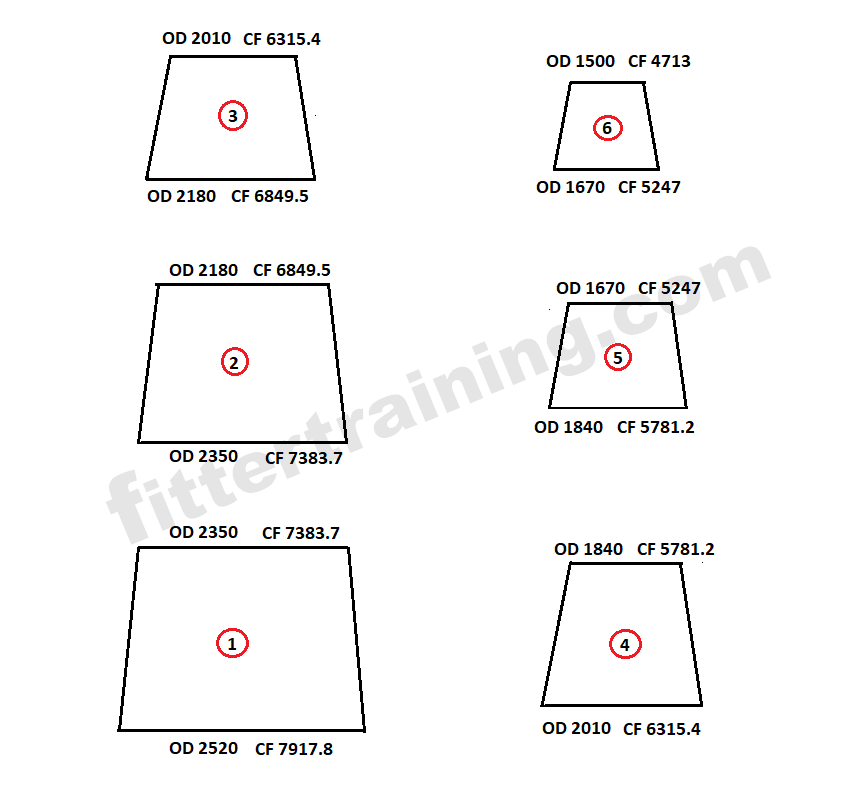
जिस तरीका से यह सब ड्राइंग बनाया गया है सेम वैसे ही आपको एक पेपर पर ड्राइंग बना लेना है ताकि फार्मूला कैलकुलेशन करने में आसान हो जाए
सभी कोन का बिग डाया OD और स्मॉल डाया OD कैलकुलेशन कर लेना है
और उसके बाद का CF डाइमेंशन कैलकुलेशन कर लेना है जैसे यह डिजाइन में दिखाया गया है
सभी कोन का एक नंबर दिया गया है 1 से लेकर 6 तक
The way all these drawings have been made is the same, you have to make a drawing on a paper so that the formula becomes easy to calculate.
Big diameter OD and small diameter OD of all cones have to be calculated.
And after that CF dimension calculation has to be done as shown in the design
OD × 3.142 = CF
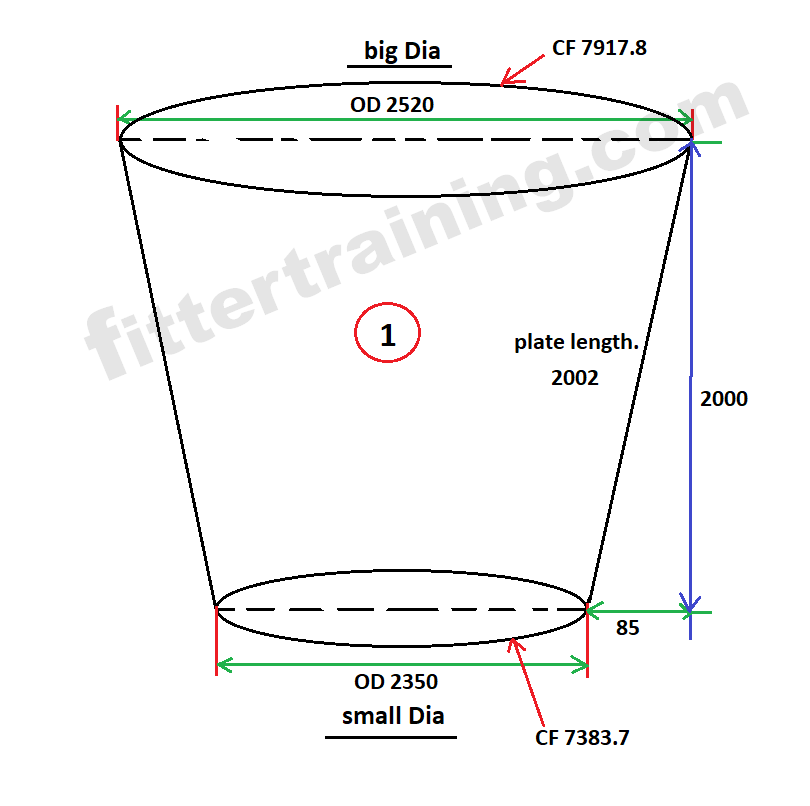
सबसे नीचे वाला नंबर ( 1 ) चिमनी कोन का कैलकुलेशन करके दिखाया गया है कैसे कैलकुलेशन करना है
चिमनी कोन लेआउट मार्किंग करने के लिए चिमनी कोन को उल्टा डिजाइन बनाना होगा
The number at the bottom ( 1 ) shows how to calculate the chimney cone.
To mark the chimney cone layout, the chimney cone will have to be designed upside down.
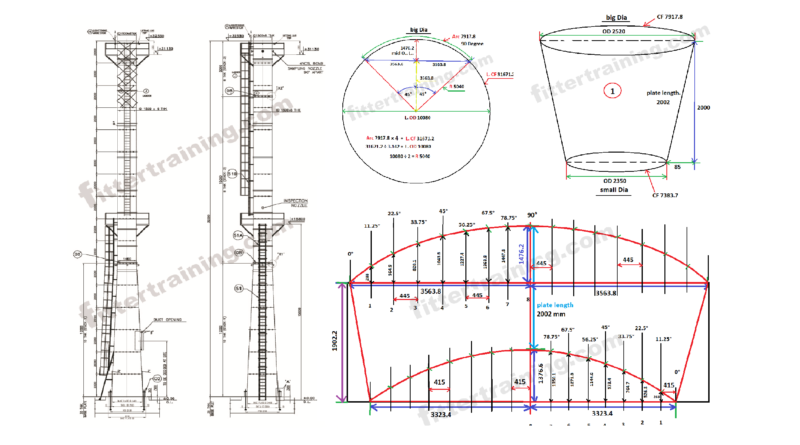
Big Dia OD 2520 × 3.142 = 7917.8 mm CF
Small Dia OD 2350 × 3.142 = 7383.7 mm CF
chimney cone plate length calculation
√( 85^2 + 2000^2 = 2002 chimney cone plate length
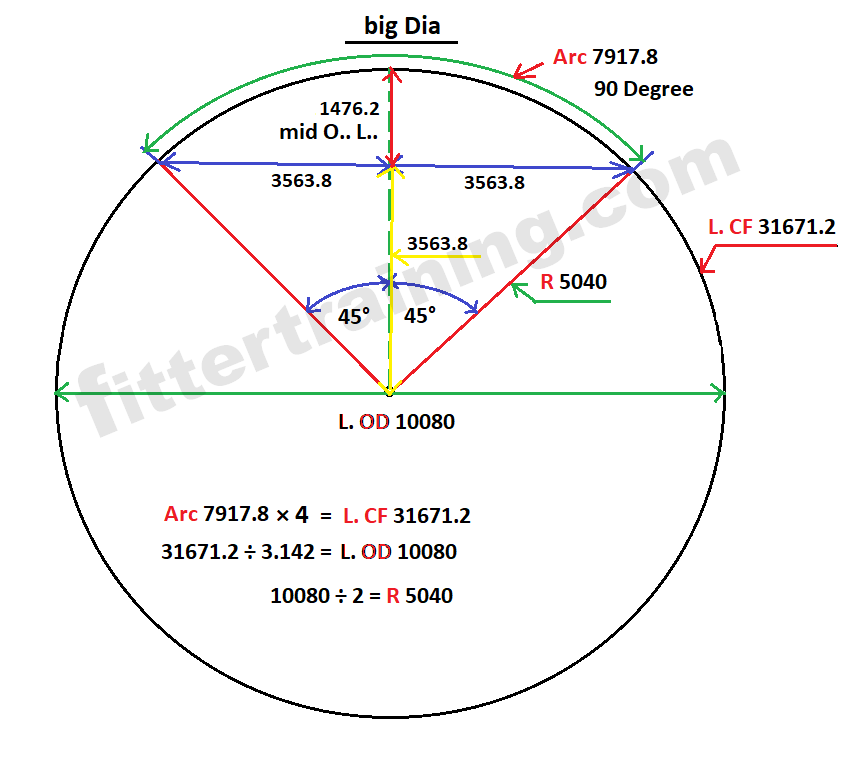
Bigg Dia Calculation
चिमनी कोन लेआउट मार्किंग कैलकुलेशन बड़ा OD डाइमेंशन के तरफ
Chimney Cone Layout Marking Calculation Big Dia
चिमनी कोन Big Dia CF डाइमेंशन 7917.8 × 4 = Layout CF 31671.2
Layout CF 31671.2 ÷ 3.142 = Layout OD 10080
Layout OD 10080 ÷ 2 = R 5040 Layout Radiu
कोन का जो CF डाइमेंशन जो है ! वह लेआउट के ऊपर आर्क लेंथ में बदल जाएगा
The CF dimension of the cone will be converted to arc length over the layout.
और वह लेआउट के ऊपर 90 डिग्री के पोजीशन पर रहेगा सेम ऐसा ही डिजाइन बनाएं लेआउट का
And it will be at a position of 90 degrees above the layout. Make a similar design of the layout.
90° degree ÷ 2 = 45° degree
Sin( 45 ) × R 5040 = 3563.8 Cord length
Cos( 45 ) × R 5040 = 3563.8 Cord length
R 5040 — 3563.8 Cord length = 1476.2 mid ordinate length
Small Dia Calculation
चिमनी कोन लेआउट मार्किंग कैलकुलेशन छोटा OD डाइमेंशन के तरफ
Chimney Cone Layout Marking Calculation Small Dia
चिमनी कोन Small Dia CF डाइमेंशन 7383.7 × 4 = Layout CF 29534.8
Layout CF 29534.8 ÷ 3.142 = Layout OD 9400
Layout OD 9400 ÷ 2 = R 4700 Layout Radiu
कोन का जो CF डाइमेंशन जो है ! वह लेआउट के ऊपर आर्क लेंथ में बदल जाएगा
The CF dimension of the cone will be converted to arc length on the layout
और वह लेआउट के ऊपर 90 डिग्री के पोजीशन पर रहेगा सेम ऐसा ही डिजाइन बनाएं लेआउट का
And it will be at a position of 90 degrees above the layout. Make a similar design of the layout.
90° degree ÷ 2 = 45° degree
Sin( 45 ) × R 4700 = 3323.4 Cord length
Cos( 45 ) × R 4700 = 3323.4 Cord length
R 4700 — 3323.4 Cord length = 1376.6 mid ordinate length
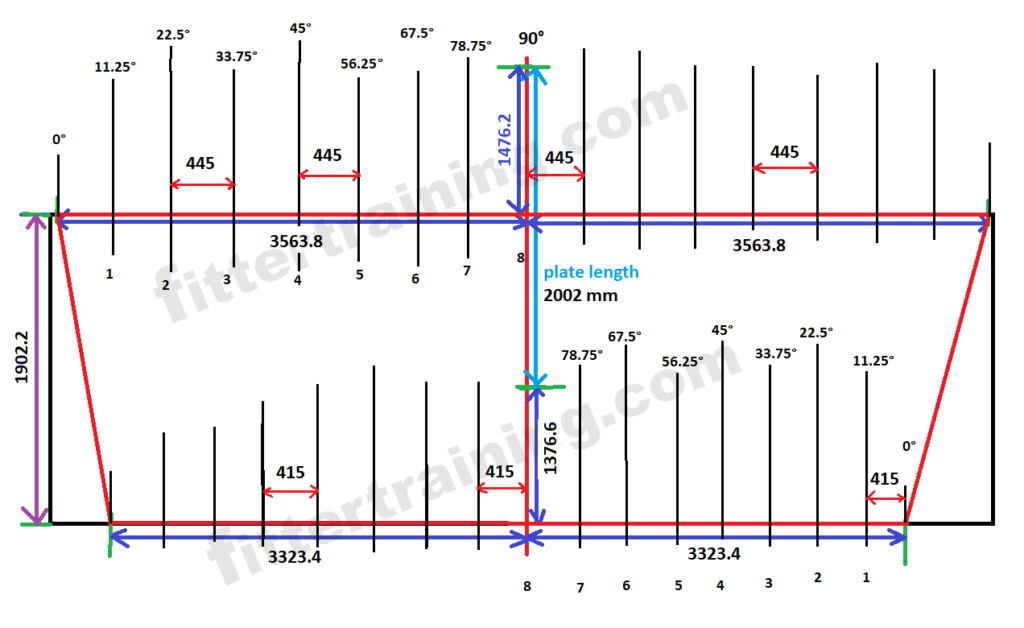
इस तरह स्क्वायर लेआउट मार्किंग करें
Make square layout marking like this
स्क्वायर लेआउट मार्किंग डाइमेंशन
Square layout marking dimensions
big Dia layout code length 3563.8
3563.8 + 3563.8 = 7127.6
Small Dia ordinate length 1376.6
Cone plate length dimensions 2002
mid ordinate length 1476.6
1376.6 + 2002 = 3378.6 – 1476.6 = 1902.4
Layout square dimension 7127.6 × 1902.2
इस तरह स्क्वायर लेआउट मार्किंग करने के बाद और बीच में एक वर्टिकल सेंटर लाइन मार्किंग करें
और स्मॉल Dia कोड लेंथ मार्किंग करें सेंटर से दोनों साइड 3323.4
After doing square layout marking like this and make a vertical center line marking in between
And make small dia code length marking Both sides from center 3323.4
उसके बाद स्मॉल Dia ऑर्डिनेट लेंथ मार्किंग करें 1376.6
After that make small dia ordinate length marking 1376.6
उसके बाद चिमनी कोन प्लेट लेंथ डाइमेंशन मार्किंग करें वर्टिकल सेंटर लाइन के ऊपर 2002 mm
Then mark the chimney cone plate length dimension above the vertical center line. 2002 mm
उसके बाद बिग Dia कोन कोड लेंथ मार्किंग करें सेंटर से दोनों साइड 3563.8 mm
After that mark Big Dia Cone Code Length from center to both sides 3563.8 mm
उसके बाद बिग डाया कोन मिड ऑर्डिनेट लेंथ मार्किंग करें लेंथ 1476.2 mm
After that mark the big Dia cone mid ordinate length. 1476 2 mm
उसके बाद जितना सेंटर लाइन में रेडियस मार्किंग करना है कोड लेंथ को उतने सेंटर लाइन में डिवाइड करें
After that, divide the code length into as many center lines as the radius marking is to be done.
Small Dia code length 3323.4 ÷ 8 center line = 415.4 mm एक सेंटर लाइन से दूसरे सेंटर लाइन की दूरी
Bigg Dia code length 3563.8 ÷ 8 center line = 445 mm एक सेंटर लाइन से दूसरे सेंटर लाइन की दूरी
सभी सेंटर लाइन का डिग्री कैलकुलेशन करें
Calculate degree of all center lines
बीच का जो में वर्टिकल सेंटर लाइनहै वह 90 डिग्री के पोजीशन पर है
The one in the middle which is the vertical center line is at a 90 degree position
जितना सेंटर लाइन में मार्किंग कर रहे हैं उतने सेंटर लाइन में डिग्री को डिवाइड करें
Divide the degrees in the center line by the number of degrees you are marking.
यह 8 सेंटर लाइन में मार्किंग किया गया है अब 16 सेंटर लाइन या 32 सेंटर लाइन में भी आप मार्किंग कर सकते हैं
It is marked in 8 center lines, now you can mark in 16 center lines or 32 center lines also.
90 ÷ 8 = 11.25°
11.25° center line 1
11.25 × 2 = 22.5° center line 2
11.25 × 3 = 33.75° center line 3
11.25 × 4 = 45° center line 4
11.25 × 5 = 56.25° center line 5
11.25 × 6 = 67.5° center line 6
11.25 × 7 = 78.75° center line 7
11.25 × 8 = 90° center line 8
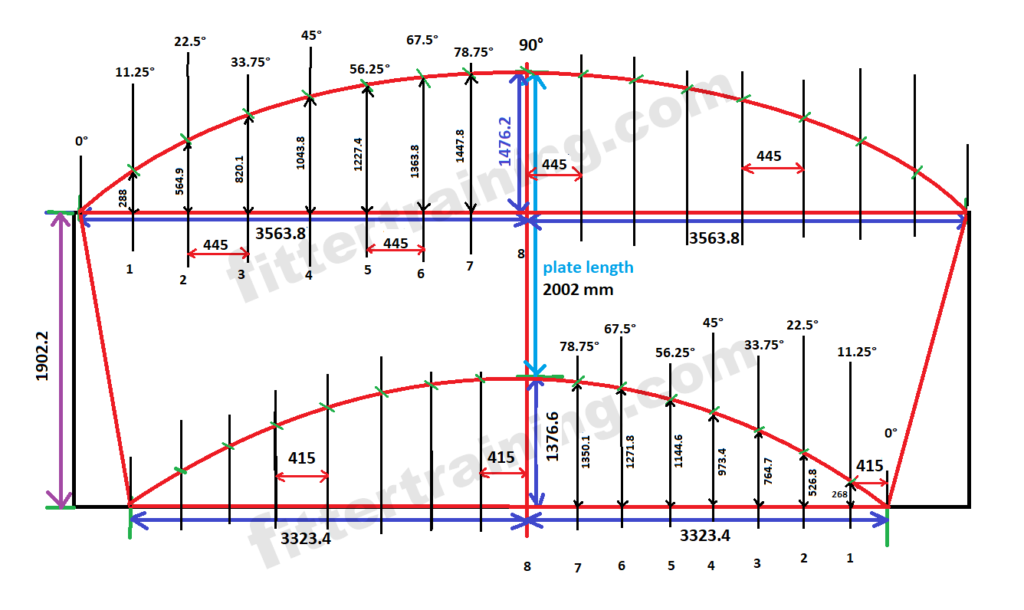
Big Dia radius marking
बीच सेंटर लाइन कट बैक डाइमेंशन 1476.2 mm
बाकी सेंट्रल लाइन पर मार्किंग कट बैक कैलकुलेशन इस तरह करें
Do the marking cut back calculation on the remaining central line like this.
Sin( 11.25° ) × 1476.2 = 288 mm
Sin( 22.5° ) × 1476.2 = 564.9 mm
Sin( 33.75° ) × 1476.2 = 820.1 mm
Sin( 45° ) × 1476.2 = 1043.8 mm
Sin( 56.25° ) × 1476.2 = 1227.4 mm
Sin( 67.5° ) × 1476.2 = 1363.8 mm
Sin( 78.75° ) × 1476.2 = 1447.8 mm
Sin( 90° ) × 1476.2 = 1476.2 mm
Small Dia radius marking
बीच सेंटर लाइन कट बैक डाइमेंशन 1376.6 mm
बाकी सेंट्रल लाइन पर मार्किंग कट बैक कैलकुलेशन इस तरह करें
Do the marking cut back calculation on the remaining central line like this.
Sin( 11.25° ) × 1376.6 = 268.5 mm
Sin( 22.5° ) × 1376.6 = 526.8 mm
Sin( 33.75° ) × 1376.6 = 764.7 mm
Sin( 45° ) × 1376.6 = 973.4 mm
Sin( 56.25° ) × 1376.6 = 1144.6 mm
Sin( 67.5° ) × 1376.6 = 1271.8 mm
Sin( 78.75° ) × 1376.6 = 1350.1 mm
Sin( 90° ) × 1376.6 = 1376.6 mm
इस तरह से सभी कट बैक मार्किंग करने के बादरेडियस मार्किंग करें एक पट्टी के जरिए
और दोनों रेडियस को साइड सेंट्रल लाइन मार्किंग करके मिला देना है
इस तरीका से पहला कोन रेडियस लेआउट प्लेट तैयार हो जाएगा
इसी तरीका से बाकी नंबर 2 नंबर 3 और नंबर 4 और नंबर 5 और नंबर 6 चिमनी कोन रेडियस प्लेटलेआउट मार्किंग करें
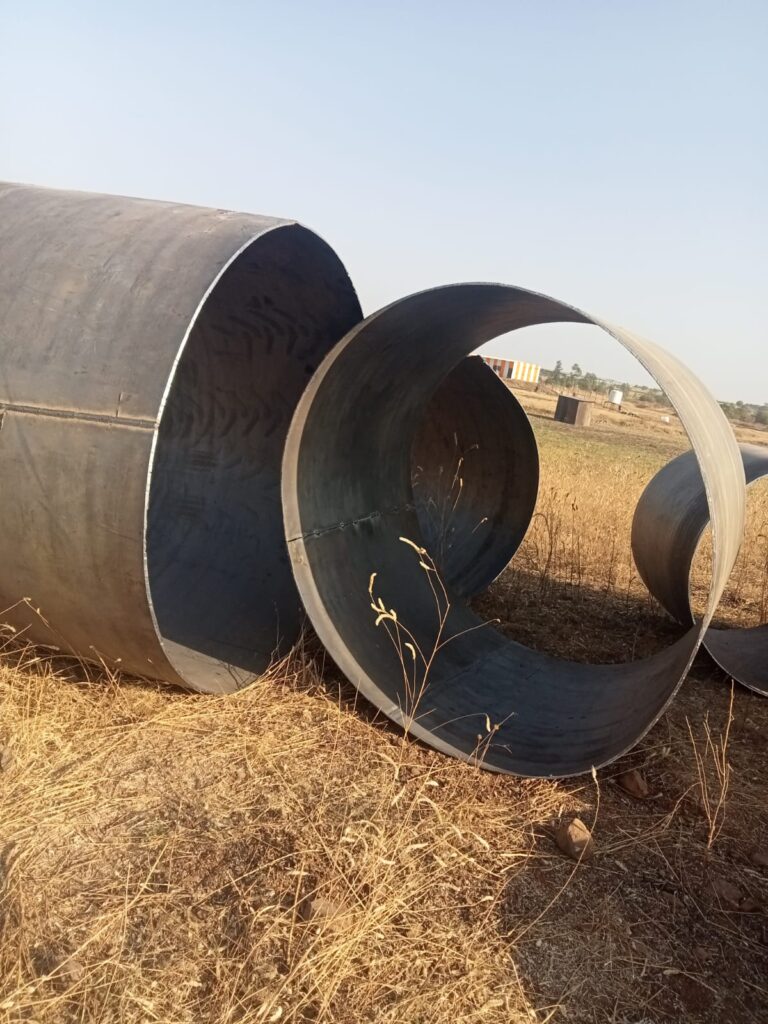
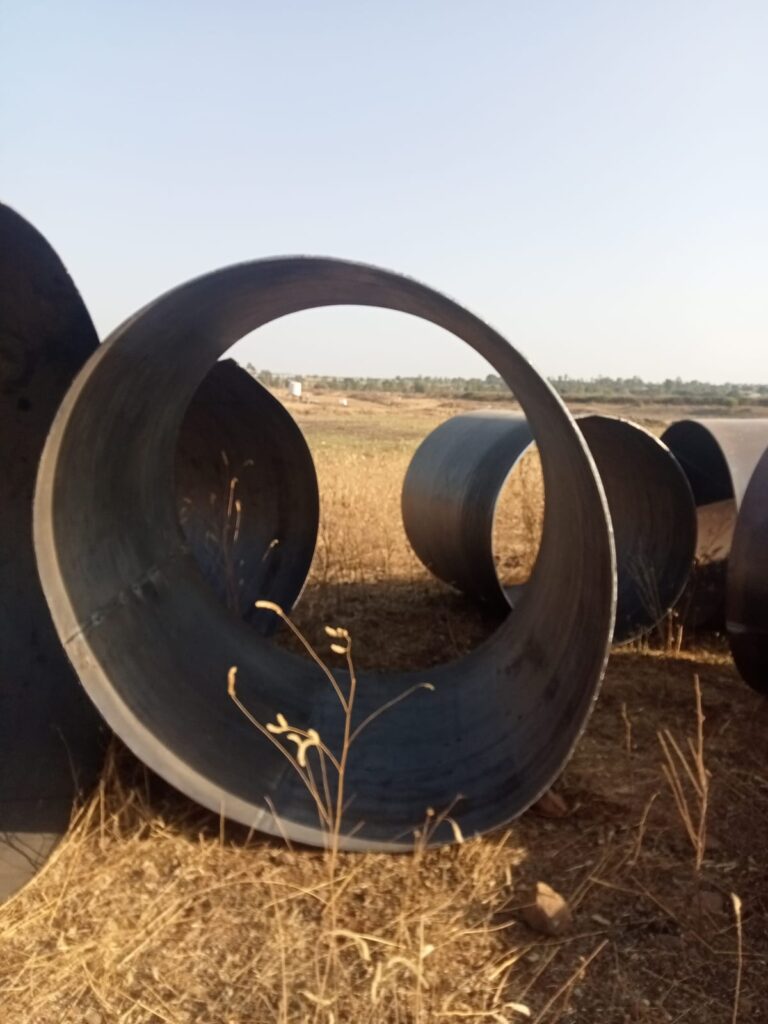
और सभी को राउंड बेंडिंग करके एक साथ जॉइंट कर देना है और वेल्डिंग कर देना है आपका डिग्री वाला चिमनी तैयार हो जाएगा
After doing all the cut back marking properly, do radius marking through a strip.
And both the radius have to be joined by marking the side central line.
In this way the first cone radius layout plate will be prepared.
In the same manner, do the remaining No. 2, No. 3 and No. 4 and No. 5 and No. 6 chimney cone radius plate layout markings.
And all have to be jointed together by round bending and welding, your degree chimney will be ready.
Thanks for visit my website

Nice